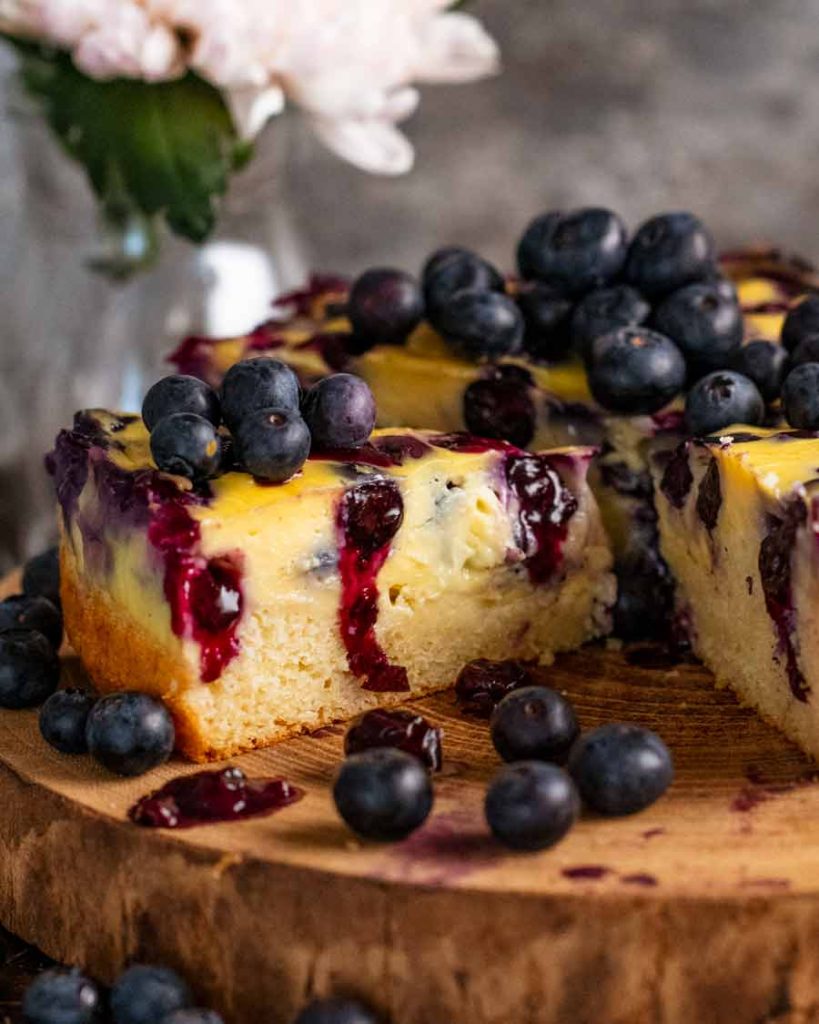
Vanilla cake with custard baked into it, studded with bursting blueberries. Rustic. Easy. Dreamy.
The custard layer especially is something else! It’s melt-in-your-mouth creamy but set enough to cut into neat slices. If the photo below has you drooling, read on …

Custard cake with blueberries
This cake came about as one of those “wouldn’t it be awesome if…….” ideas that suddenly materialise in my mind and I need to blurt out to anybody within earshot. I gestured enthusiastically as I described my vision of a cake and how I thought I could make it work. My excitement built as I started imagining how it was going to taste, until it bubbled over and I had to give it a go.
So I made it. And the reality turned out even better than I imagined!
It goes like this. Take a vanilla sponge base, perfumed with a subtle whisper of lemon. Smear a serious layer of custard on top. And I mean serious – as in equal in volume to the cake; we want lots. Finally, stud said custard generously with plump, juicy blueberries. Now bake that puppy!
A mouthful of tender vanilla cake, creamy custard and a blueberry bursting in your mouth is one of the best things you will ever experience in your life.
The thing that’s lovely about the custard layer is it’s set enough with cooking that you can cut perfect, neat slices like a cake. But the moment you eat it, the custard melts and floods your mouth with lush, creamy richness. And it is rich, but not overly so. It’s also definitely not too sweet with only 1/3 cup (60g) sugar in the whole custard layer.

In case you doubt me, here’s proof of creaminess:

Anatomy of this Blueberry Custard Cake
-
Vanilla sponge cake base – I chose to use my yogurt-based cake batter for this cake because it’s designed to rise well even when weighed down with heavy toppings (example: this Strawberry cake with 500g / 1lb of fresh strawberries!). My signature Vanilla Cake batter, while more plush, would get squished into a pancake with such a thick layer of custard on top.
-
Custard layer – The custard is a crème pâtissière, a type of French custard. It’s luxurious in mouthfeel but not overly sweet or rich, a fine balancing act our Gallic friends have mastered with so many of their desserts. It’s the same custard used in the famous Flan Pâtisseier, a giant French custard tart!
-
Blueberries – I suppose cake and custard alone would have been enough already to make a great cake. But I couldn’t resist adding blueberries. It’s partially for visuals – love those explosions of purple dotted through the cake. But it’s also because a mouthful of tender vanilla cake, creamy custard with fresh blueberry bursting in your mouth is one of the best things you will ever experience in your life.

What you need to make Blueberry Custard Cake
I think you’re also going to love that there’s nothing unusual or gourmet called for in this recipe!
1. Custard layer
Here’s what you need for the custard layer:

-
Milk – full fat dairy please. Low fat will work but you will lack that rich mouthfeel. I’ve never tried non-cow milk, either.
-
Egg yolks – I’ve pictured 4 eggs because that’s what you’ll probably need for the yolks called for in this recipe. Egg yolks give custard the silkiness, yellow colour, as well as thickening power. In this cake it also sets the custard so it doesn’t run everywhere when you cut a slice.
Leftover egg whites – Here’s my list of what I do with them and all my egg white recipes can be found in this recipe collection.
-
Vanilla bean paste – I use the paste because I like the little vanilla seed specks in my custard. However I choose paste over real vanilla beans in this and other custard recipes I make (such as Creme Brûlée, Flan Patissier, Creme Anglaise) because it doesn’t use up a whole bean. I I know it would personally irritate me to see a recipe calling for “half a vanilla bean” so I won’t do it to you either.
Substitute with vanilla extract (no specks, but that’s cool). For a recipe like this, I think it would be a shame to resort to artificial vanilla essence, so avoid.
-
Sugar – caster sugar / superfine sugar with finer granules is better as it dissolves more easily. However, regular / granulated sugar will be fine too.
-
Cornflour / cornstarch – This thickens the custard along with the eggs. Similarly it also set the custard so it’s sliceable.
-
Butter – This enriches the custard. You know butter is never an unwelcome guest, and this recipe is no exception!
2. Cake layer
And here’s what you need for the cake:

-
Yogurt – Yogurt is a little baking trick that make cakes with a tender, never-dry crumb. It adds moisture to your batter without thinning it out like, say, milk. Which means you don’t need to use as much flour. And less flour means a more moist cake!
Acidity in yogurt also reacts with and activates baking soda. However this is not applicable to this recipe as we are using baking powder rather than baking soda. I found baking powder made my yogurt batter rise more evenly (baking soda results in an unsightly hump!).
-
Oil – Another cake moisture-improvement trick. While butter adds flavour, oil will gives you a moister result than butter. We really need good moistness in this cake, to be sure the cake stays tender even after the 45 minute bake time required to set the custard.
-
Sugar – As above, superfine / caster sugar is preferred but regular / granulated will work fine.
-
Lemon zest – Combined with the yogurt, the zest gives the sponge layer a hint of freshness. This distinguishes the cake component from the vanilla custard so the dessert is not so one-dimensional in flavour. This was a late addition and I really liked what it brought to the cake!
-
Vanilla – I use vanilla extract here, not vanilla bean paste which I think is wasted because you can’t see the specks. Try to give artificial essence a miss because it tastes, well, artificial.
-
Blueberries – Fresh or frozen. If using frozen, don’t thaw else it will bleed terribly when you mix it through the custard!
-
Flour – Just plain / all-purpose flour.
-
Baking powder – The rising agent in this cake. As mentioned above, I’ve used baking soda in the past for this batter but I found the cake got an unsightly hump in the middle. Baking powder gives it a much more even rise.
-
Egg – Just one egg is all you need.
-
Salt – Just a pinch. It’s good baking practice to add a little salt as it brings out the other flavours.
How to make Blueberry Custard Cake
There’s a few parts to this cake (custard, cake batter, layering), but I promise it is straightforward. Remember, it’s a rustic cake, so relax. We aren’t seeking perfect layers and placement of blueberries here!
1. Custard
Custard is so much more straightforward than most people realise. Custard is just milk thickened with cornflour/cornstarch and egg yolks, then baked in the oven to finish setting it.
The only thing to watch out for is to avoid scrambling the eggs with the hot milk, but the recipe steps are designed to avoid this risk.

-
Heat the milk with vanilla and half the sugar, just until it is steaming. Watch to make sure it doesn’t boil over – it can happen in a blink of an eye!
-
Whisk yolks – Meanwhile, using a handheld whisk, whisk the egg yolks with sugar until incorporated (5 seconds). Then whisk in the cornflour until you can no longer see white. It’s easier to do it in this order to avoid a storm of cornflour erupting in your face. Just trust me on this.
-
1/2 cup hot milk – While still whisking, slowly pour in about 1/2 cup of hot milk. Once incorporated, pour in the remaining hot milk while whisking continuously.
This method of gradually combining the hot milk with the egg yolks (tempering) is to make sure the hot milk doesn’t accidentally scramble the eggs.
-
Return to stove – Pour the mixture back into the same saucepan and over medium (or medium high, for pros), whisk constantly for 2 to 3 minutes. (The exact time depends on how hot your milk was, residual heat in saucepan etc.) At first, the custard will be watery but as it heats up, it will thicken and you will instantly feel it. See photo in step 5 below.
If at any point you feel like it’s thickening too fast, just take it off the stove and keep whisking. And if it starts to look lumpy as it is thickening, don’t fret, it does that sometimes! Just keep whisking and it will smooth out.

-
Bubbles → 30 second whisk – Once the custard becomes thick and hot, you will see big lazy bubbles appearing on the surface and bursting (pause whisking to check). At the sight of the first bubble, with the stove on low, whisk for a further 30 seconds then remove the saucepan from heat.
The appearance of a lazy bubble is the signal that tells you when the custard is cooked enough. How much longer you cook it for after the bubble appears is determined by the volume of custard you’re making and the thickness you are aiming for. In our case, 30 secs whisking is right.
-
Enrich with butter – With the pot off the stove, whisk in the cold butter cubes until fully incorporated.
-
Pour custard into the same bowl you used to whisk the egg yolks, to save dirtying a new bowl.
-
Cover with cling wrap pressed against the custard surface to avoid a skin forming. Set aside on the countertop while you prepare the cake batter. The custard can still be warm when we layer it onto the cake but we don’t want it piping hot.
Making ahead – The custard can be made the day before and refrigerated after it fully cools. In fact, the flavour of the custard improves overnight. It will solidify into a rubbery mass but don’t stress. Just use a handheld beater to beat it and watch as it magically turns into a creamy, dollop-able custard again!
2. The simple cake batter
Oh this magic yogurt cake batter, used in so countless cakes on this website that many of you love so much!

-
Whisk wet – Place all the wet ingredients in a bowl and whisk until combined. That’s the yogurt, sugar, oil, egg, vanilla and lemon zest.
-
Add dry – Add the dry ingredients (flour, baking powder and salt), and whisk until smooth.
-
Pour into a lined 8″/20cm springform pan.
-
Smooth the surface.
3. Custard layering
The specific layering technique I use is all about achieving a straight and level line where the cake and custard interface, and an even distribution of blueberries throughout the custard. Fussy, who me? 😳

-
Half custard – Dollop half the custard around the edges of the tin on the surface of the batter then spread inwards to spread it across the surface of the cake. This method creates a straight, even line where the cake meets the custard. If you dollop it in the middle, you sort of end up with a cake crater filled with custard. Not a bad thing, mind you.
-
Half blueberries – Scatter over half the blueberries.
-
Mix blueberries with custard – Then mix the remaining blueberries with the remaining custard.
-
Top the cake with this blueberry and custard mixture.
-
Smooth the surface, pressing in the blueberries as best you can.
-
Bake for 45 minutes at 180°C/350°F (160°C fan).
4. Optional blueberry burstage encouragement (& custard setting)

-
Blueberry burstage (OPTIONAL) – With the number of times you’ve already read the “blueberry burstage” and “bursting blueberries”, you’ve probably figured out that this particular feature appeals to me!
So much so that I like to encourage blueberry burstage by pulling the cake out of the oven 10 minutes before it’s done to deliberately burst some blueberries using a small knife.
You don’t have to do this step. It’s entirely optional. (*She says, unconvincingly*)
-
Cool on counter – The cake is done when the custard surface is set (ie. you can touch it and your finger stays clean) but there’s still a bit of a wobble underneath. You want some wobble. No wobble means the custard is overcooked and consequently will become firmer in texture than ideal once cooled.
By the way, I’m sure you’ve figured it out by now but this recipe is specifically designed so the cake and custard both bake to perfection in the same time. To this end, there should be no browning on the surface of the custard. It should just be yellow with (hopefully) lots of blueberry guts seeping out and through it (are you counting how many times I use those kind of graphic descriptions??!😂)
-
Fridge 12 hours – This step is to fully set the custard so you can cut neat slices of the cake. Do not skip or shortcut the refrigeration time! Having done this myself cutting into the cake to early to find the custard is not fully set, I can tell you that 6 hours is not enough and 8 hours is still high risk.
Overnight, and minimum 12 hours, is a safe bet!
PS. If the custard is not fully set, while visually it may not present quite the same as what you see in the photos, let me assure it is still a heavenly eating experience. Some might even say a better one because you get big dollops of creamy custard.
-
Voilà! Here’s your (rustic, fabulous) masterpiece!
If you’re a little fussy like me, you can trim along the edges of the cake to make the edges smooth just using scissors. Don’t toss the trimmings, eat as you go. Think – blueberry fruit leathers (in scrappy, mini form.)

Serving, storing
I topped the cake with extra blueberries for photograph purposes only. You really don’t need to for serving, there’s plenty going on in the cake as it is.
As for serving, cut like a cake and serve like cake.
The one thing I will really encourage though is to eat it at room temperature instead of fridge-cold. Chilled custard is nice. But room temperature custard is better. It’s creamier and tastier. Same goes for cake.
So take the cake out of the fridge at least 30 minutes prior to serving, preferably 1 hour. If you can, slice fridge-cold then let the slices come to room temperature. The reason is you will get neater slices with sharper edges when the cake is cut cold, as the custard smears less on the knife. The cake is at room temperature in all the photos in this post, and when I cut the cake in the video below.
I’d love to know if you try this cake. And if you do, tell me if where you sit on blueberry burstage! Did you take the extra step to encourage burstage? *Do it! Do it! Do it!* – Nagi x
Watch how to make it
Note: In this video I do not spread the custard on the cake properly! The better way to do it is as per the recipe card below – put big dollops around the edges of the cake and spread inwards. I will update the video after I make the cake again!
Hungry for more? Subscribe to my newsletter and follow along on Facebook, Pinterest and Instagram for all of the latest updates.

Blueberry Custard Cake
You’ll love how you can cut neat slices but the custard is melt-in-your-mouth!
Ingredients
Custard:
- 1 1/2 cups milk , full fat
- 1 tsp vanilla bean paste (or extract)
- 1/3 cup superfine/caster sugar (Note 1)
- 1/4 cup / 60 g egg yolks (~4 large eggs) (Note 2)
- 3 1/2 tbsp cornflour / cornstarch
- 30 g / 2 tbsp unsalted butter , cold, cut into 1 cm / 1/2″ cubes
Cake – wet:
- 1/2 cup superfine/caster sugar (Note 1)
- 1/4 cup canola oil (or other neutral oil)
- 1 large egg (Note 3)
- 1/2 cup plain yogurt (Note 4)
- 1/2 tsp vanilla extract
- 2 tsp lemon zest , finely grated (1 large lemon)
Cake – Dry:
- 1 cup flour , plain / all-purpose
- 2 tsp baking powder (if old, check it’s still active)
- Pinch of salt
Blueberries:
- 250 g / 8 oz blueberries , fresh or frozen (do not thaw)
Instructions
-
Preheat oven to 180°C/350°F (160°C fan) with the shelf in the middle of the oven.
-
Grease a 20 cm / 8″ springform pan with butter. Line the base and sides with paper.
Custard:
-
Heat milk: Heat the milk with vanilla and half the sugar in a medium saucepan over medium heat until hot.
-
Whisk egg: Whisk yolks with remaining sugar, then whisk in the cornflour.
-
Milk into egg: Slowly pour about 1/2 cup hot milk into the eggs while whisking. Once incorporated, pour in remaining milk and whisk to combine.
-
Thicken: Pour the mixture back into the saucepan. Cook on medium, whisking constantly until you feel it starting to thicken then immediately turn down to low (2 – 3 minutes). Keep whisking then when you see a lazy bubble appear and burst on the surface, whisk for 30 seconds longer.
-
Enrichen with butter: Take off the stove. Whisk in butter until smooth. Scrape into a bowl then cover with cling wrap touching surface. Leave to cool while making the batter (Note 5 for custard tips)
Cake:
-
Batter: Whisk Wet ingredients in a large bowl. Add the Dry ingredients then whisk until smooth. Remove 1/3 cup of the batter (Note 5) then pour the remaining batter into the prepared pan and smooth the surface. (Bake the 1/3 cup batter in a separate greased ramekin for 25 minutes).
-
Custard topping: Whisk custard until smooth. Dollop half around the edges of the cake surface then spread inwards with offset knife. Smooth the surface, then scatter with half the blueberries. Mix remaining blueberries into remaining custard, then spread across the cake surface, pressing blueberries in to flatten the surface.
-
Bake 45 minutes: Place the cake in the oven and bake for 35 minutes. Remove, then use 2 small paring knives to burst some of the blueberries on the surface (1 knife to stop blueberry spinning, the other to burst). Limit bursting time to 1 minute, no longer! Then bake for a further 10 minutes.
-
Cool: Remove cake from the oven. Fully cool in the cake pan (around 3 hours). Then refrigerate for 12 hours, still in the pan.
-
Serve! Remove cake from the pan then cut into slices. Best served at room temperature rather than fridge cold!
Recipe Notes:
2. Yolks – I wouldn’t ask you to measure the yolks if it didn’t matter. For custard, it matters! The size of yolks differs from egg to egg so it really is best to measure.
Leftover egg whites – Here’s my list of what I do with them and all my egg white recipes can be found in this recipe collection.
3. Large eggs are of a size that is an industry standard 55g/2o each, sold in cartons labelled as such.
4. Yogurt is a great trick for making cakes with a moist crumb, read in post for why. Full fat is best though low fat works ok. Use a plain yogurt, not sweetened.
5. Custard – Don’t worry if it starts to look lumpy on the stove, as you continue whisking it will become smooth. To avoid scrambled eggs, whisk constantly (but leisurely!) while on the stove. If you are concerned about bits of scrambled eggs, just strain the custard through a fine mesh colander into the bowl. Custard can be slightly warm when putting in batter but not piping hot. It will firm up as it cools. Give it a whisk and it will loosen and become smooth again.
6. Removing 1/3 cup batter – This is just to give the right ratio of cake to custard in this cake for both eating experience and ensuring the cake and custard cook in the same time. Scaling down the batter slightly was too difficult, easier to take out 1/3 cup and just bake a mini cake. Use a ramekin or similar, not a muffin tin, it will affect heat circulation in the oven.
7. Storage – This will keep in the fridge for 4 to 5 days. Best to serve at room temperature so the custard really melts in your mouth!
8. Nutrition per slice.
Nutrition Information:
Life of Dozer
A face that’s successfully scored many cake samples over his lifetime.