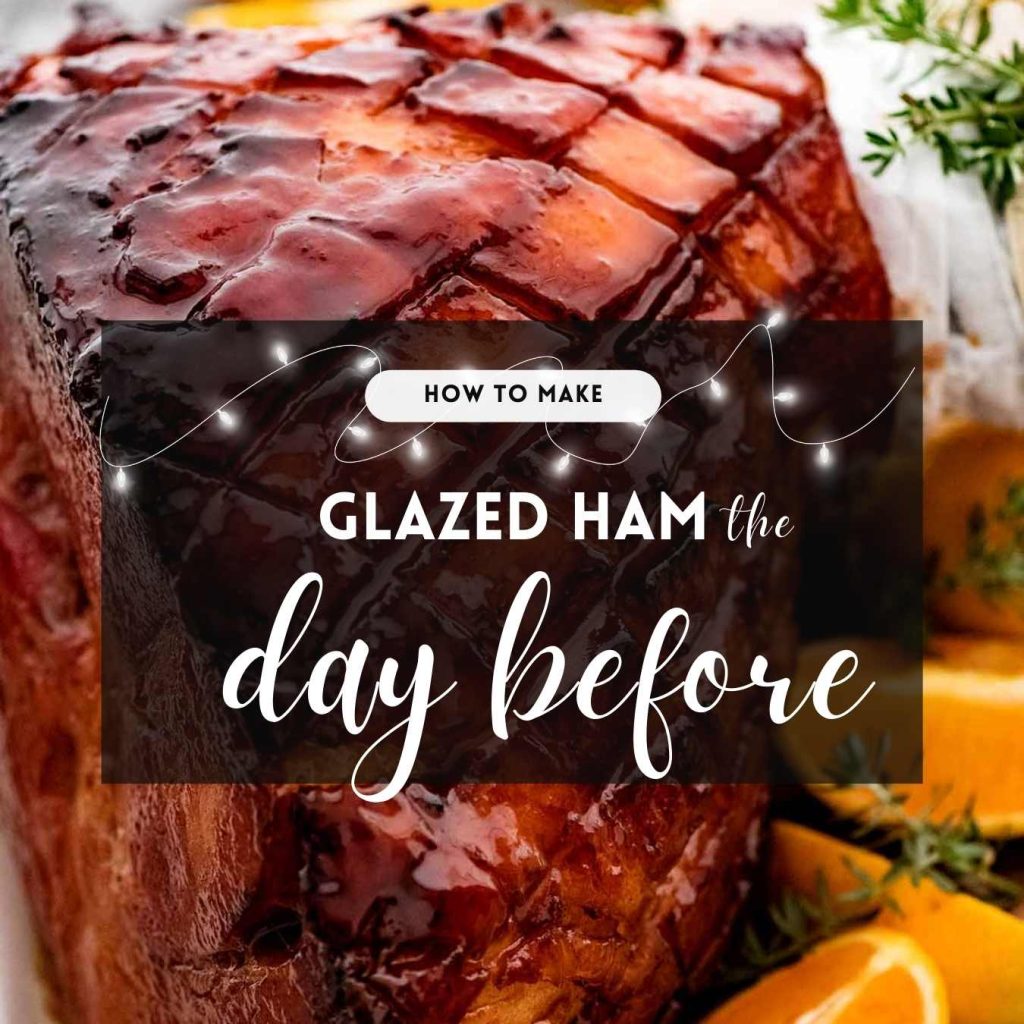
For years, I’ve been making my glazed ham the day before serving then just reheating it on the day of. It comes out 100% perfectly. The glaze is just as good as freshly made and the ham flesh doesn’t dry out at all. Use this make-ahead glazed ham method for either my favourite Maple Glazed Ham or classic Brown Sugar Glazed Ham!

I secretly love the challenge of coming up with menus that have a “wow” factor but has plenty of make-ahead options so I can reduce my workload on the day. Nobody wants to be stuck in the kitchen when they have friends and family over.
But also because I secretly dream of being a poised cooking goddess, Nigella Lawson style, who can swan out gracefully from the kitchen with plate after plate of food without breaking a sweat.
I’m still working on that part.
As for the not being stuck in the kitchen part? I’m getting pretty good at that.
And for Christmas feasting occasions, one of my handiest secret weapons is to make glazed ham the day before!


How to make glazed ham the day before
The thing with glazed ham is that it doesn’t actually need to be cooked because it’s already cooked. It’s just about getting that glaze just right!
-
Bake day before – Make your glazed ham the day before when you’ve got time to baby-sit the ham in the oven, basting and brushing as much as needed for the perfect golden glaze. The only ham glazes I use:
i) Maple Glazed Ham – my special one, with beautiful woody maple flavour
ii) Brown Sugar Mustard Glazed Ham – my classic one


-
Cool for 2 – 3 hours on the counter until you can barely feel warmth when you hover your hand over the surface. However, the inside will still be warm – it’s a sizeable hunk of meat we’re working with here! Don’t leave a hot ham out for much longer than this, for food safety reasons.
-
Fridge 3 hours uncovered – Then refrigerate the ham uncovered for 3 to 6 hours (still in the pan, with all the pan juices) to allow the inside of the ham to cool right down. You do not want to cover the ham while there’s even a bit of residual warmth on the inside because it will make the ham sweat = compromises the glaze. 😩
-
Cover then refrigerate overnight – Cover the ham loosely with a sheet of baking/parchment paper (the glaze won’t stick) then loosely with foil or cling wrap.
-
Overnight uncovered – Sometimes, if I am pressed for time so the ham hasn’t fully cooled before I head to bed, I just leave the ham uncovered in the fridge overnight. All that fat on the surface of the ham prevents the ham from drying out, and the cut face is so well caramelised that it too is not at any risk of drying out.
However, I do recommend covering if you have time to fully cool the ham. For precaution and also so you don’t cross contaminate foods with odours. Nobody wants ham flavour infused in their mini cheesecakes!

-
Reheat – Take the ham out of the fridge 2 hours prior. Now, you have two options here. What I do these days is to reheat only to rejuvenate the glaze which only takes around 40 minutes. I don’t try to reheat it all the way through because I figure by the time the ham is presented/sliced/served, the thin ham slices are cool anyway. But I do care about making the glaze nice and shiny again!
To reheat the glaze only, put it in the oven preheated to 180°C/350°F (160°C fan forced). Pop the ham in then brush the reserved ham glaze and pan juices onto the surface of the ham every 10 minutes or so, squidging your brush into the parts of the pan where the juices have caramelised the most (this is how you get really good colour on hams).
If you have some pesky patches that just won’t caramelise, don’t be afraid to foil cover the parts that are already golden and flick the oven grill/broiler on high to speed things up (but keep a close eye on it, it colours fast).
Once the glaze has been rejuvenated, the ham can sit out for a couple of hours until ready to serve. Give it a baste just before serving to gloss is up again!
To reheat the ham all the way through – If you really want to reheat the ham all the way through, cover loosely with baking/parchment paper then loosely with foil. Then reheat in a low 150°C/300°F (130°C fan) oven for 2 – 2 1/2 hours or until the centre of the ham registers 60°C/140°F (or a skewer inserted into the middle is hot).
Add water as needed to prevent pan juices from drying out (we want a syrupy sauce at the end to serve with the ham!) You shouldn’t need oven time with the foil off to re-caramelise the glaze but you can if needed. (As above, don’t hesitate to oven grill/broil to speed things up and foil patch like mad!)
-
Baste, baste, baste as needed for a stunning shiny sticky finish!
-
Sauce reduction, if needed – If the pan juices are too watery (because you accidentally added too much water when reheating), either return the pan without the ham into the oven to reduce to a syrupy consistency. Or pour it into a saucepan and simmer on the stove.
-
Serve the ham as you ordinarily do! My default these days is to put it on a wooden board on a bed of green fluff age (whatever’s cheap at the time – kale, watercress, endive are regulars). Wrap paper around the handle, tie with a ribbon, stick a sprig of rosemary in!
Use any ham glaze!
Hungry for more? Subscribe to my newsletter and follow along on Facebook, Pinterest and Instagram for all of the latest updates.

How to make glazed ham the day before
The ham comes out 99% perfectly. The glaze is just as good as freshly made and the ham flesh doesn’t dry out. You can either reheat the ham all the way through (~2 hours) or just reheat the glaze to make it shiny again (~30 – 40 minutes) and leave the inside at room temperature (this is what I do these days). Even if the ham is warm, it’s cool by the time it’s carved/served/eaten, so what’s the difference?! (You can also always briefly microwave the plate of carved ham).
Use this make-ahead glazed ham method for either my favourite Maple Glazed Ham or classic Brown Sugar Glazed Ham.
Ingredients
- Glazed ham recipe of choice (either half or full ham legs, but bone-in highly recommended rather than boneless, Note 1)
Instructions
The day before:
-
Bake day before – Make the Maple Glazed Ham or Brown Sugar Glazed Ham the day per the recipe, before when you’ve got time to baby-sit the ham in the oven, basting and brushing as much as needed for the perfect golden glaze.
-
Cool for 2 – 3 hours on the counter until you can barely feel warmth when you hover your hand over the surface. However, the inside will still be warm – it’s a sizeable hunk of meat we’re working with here! Don’t leave a hot ham out for much longer than this, for food safety reasons.
-
Fridge 3 hours uncovered – Then refrigerate the ham uncovered for 3 to 6 hours (still in the pan, with all the pan juices) to allow the inside of the ham to cool right down. You do not want to cover the ham while there’s even a bit of residual warmth on the inside because it will make the ham sweat = compromises the glaze. 😩
-
Refrigerate overnight – Cover the ham loosely with a sheet of baking/parchment paper (the glaze won’t stick) then loosely with foil or cling wrap. (Note 1 Refrigerating uncovered if pressed for time)
Reheating on the day:
-
De-chill – Take the ham out of the fridge 2 hours prior.
-
Reheating glaze only (what I usually do) – Preheat the oven to 180°C/350°F (160°C fan). Put the ham in and reheat until the glaze is rejuvenated, about 30 – 40 minutes. Don’t worry about heating the ham all the way through. Baste as needed using the pan juices (sludge brush in most caramelised parts of the pan).
-
Reheating all the way through – Cover loosely with baking paper then foil. Reheat in a 150°C/300°F (130°C fan) oven for 2 – 2 1/2 hours or until the centre of the ham registers 60°C/140°F, remove the cover towards the end and basting once or twice. (We don’t want the ham to get too brown, so don’t remove the foil too early)
-
Broiler/ oven-grill speed up – If you have pesky patches that won’t colour, don’t hesitate to use the broiler/oven grill on high. It works fast (it can be 1 – 2 minutes) so keep an eye on it, and be sure to cover the areas sufficiently coloured with foil (it doesn’t get stuck).
-
Presentation – Plate up the ham as you ordinarily do, leaving the ham out for up 2 hours. Reduce the ham pan juices, if needed, to serve as the ham sauce.
-
Final baste – Reserve some of the ham juices (try to scoop out the most caramelised coloured section) in a mug to give it a final baste to make the glaze super shiny just before serving (microwave to melt if needed).
-
Bask in the glory of your magnificent glazed ham! Then carve into thin slices and serve alongside the ham sauce.
-
Cheeky tip – Loosely cover the plate of carved ham with cling wrap and microwave briefly to warm it up, if you are really hung up on having warm ham!
Recipe Notes:
2. Overnight uncovered – Sometimes, if I am pressed for time so the ham hasn’t fully cooled before I head to bed, I just leave the ham uncovered in the fridge overnight. All that fat on the surface of the ham prevents the ham from drying out, and the cut face is so well caramelised that it too is not at any risk of drying out. However, I do recommend covering if you have time to fully cool the ham. For precaution and also so you don’t cross contaminate foods with odours. Nobody wants ham flavour infused in their Christmas Cheesecake!
3. Food safety and leftover ham – Ham that’s been left out at room temperature (21C/70F) for 2 hours to 4 hours should be eaten rather than packed and refrigerated for later use.
The fridge-cold ham will much lower than room temperature during the 2 hour de-chilling time before you reheat. After it comes out of the oven, it is best to have any leftover ham back in the fridge within 2 hours (from the time it came out of the oven), though when I use my “reheat the glaze only” technique, I feel comfortable keeping leftover ham even if it’s been out for 4 hours (because the inside is not as warm so it’s a less cosy bacteria-multiplying environment than warm hams). But that’s me!
While I’ve referenced the two ham glazes on my website throughout this post (my favourite Maple Glazed Ham and classic Brown Sugar Ham Glaze), these make-ahead steps should work for any glazed ham.
I hope you found this tip useful! I’d love to know what you think if you make your glazed ham ahead of time this year. Tell me in the comments below! – Nagi x
Christmas cooking stressing you out? I get it. See my 6 best tips to make Christmas cooking easier right here!
Life of Dozer
Dozer confirms he can’t tell whether the glazed ham was made today or yesterday.